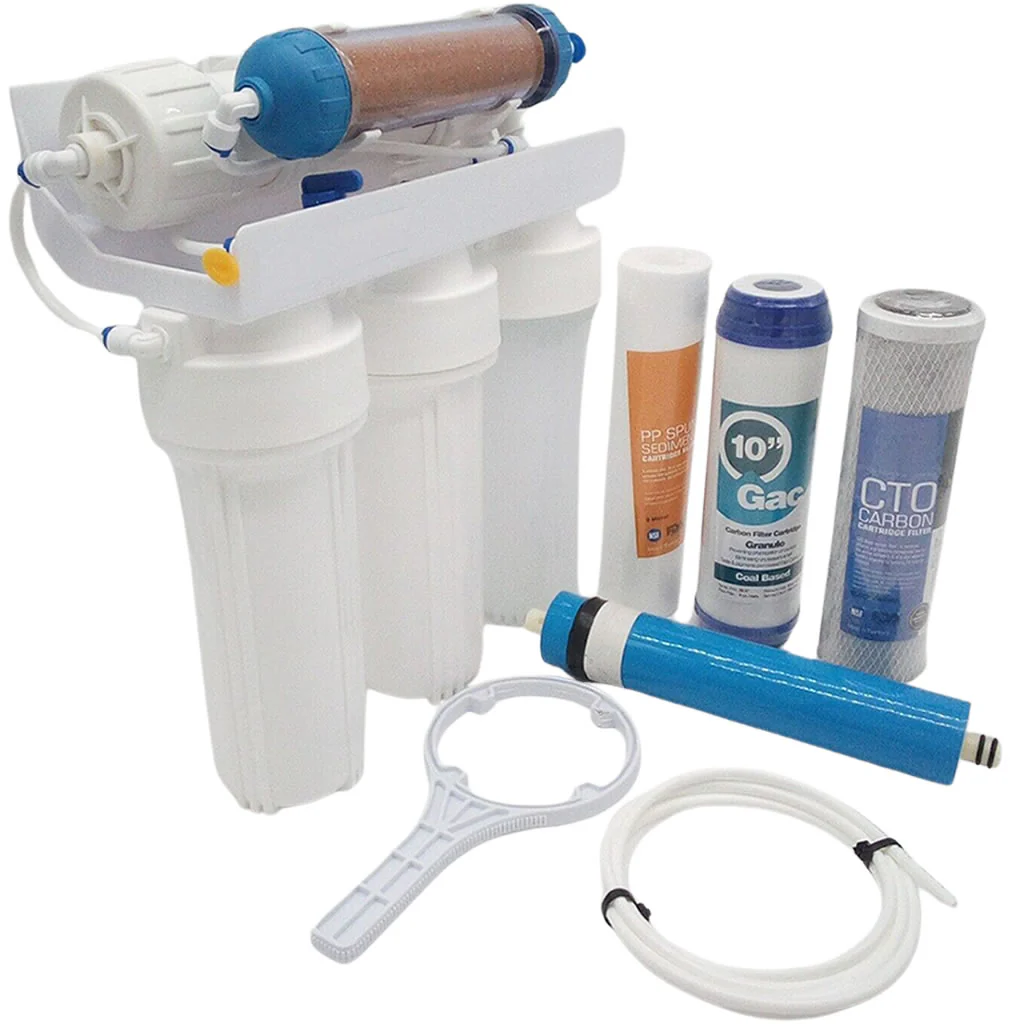
5 Stage Reverse Osmosis RO and Di Unit
Our RO/Di units include a DI chamber fitted as the final stage of filtration
( which is supplied filled with high quality tulsion MB115 Resin)
After passing through the Pre filters (stage 1 -2 and 3) and the r/o membrane, the r/o filtered water is then passed through the DI filter, to reduce the TDS reading to 0.
The 5 Stages of Filtration Are:
- 5 - Micron Sediment Filter Made of 100% Pure Polypropylene Fibres. Removes Dirt, Sand and Rust.
- A gac granular activated carbon filter Removes chlorine and organic compounds.
- A Carbon Block Filter Composed of High Performance Carbon. Removes Trihalomethanes, Pesticides, Volatile Organic Chemicals and 99.95% of Giardia and Cryptosporidium Cysts.
- High Rejection Thin Film Composite Reverse Osmosis Membranes The Membranes Remove Contaminants Present in your Water Including, up to 99% of Dissolved Salts, Lead, Copper, Barium, Bacterial By-Products, Oestrogen and Silica.
- DI Cartridge filled with tulsion MB115 mixed bed resin for total De-ionisation (polishing the water) of your reverse osmosis water.
Enabling you to achieve a total dissolved solids (TDS) of 0ppm
These Superb Systems Come with Installation Instructions, and all Pipes, Pre Filters, Post Filters, and Fittings Required for easy Installation
Please note:
- The input water must meet the following criteria for the unit to operate water temp must be less than 45 degrees Celsius.
- iron content max 0.1ppm
- Min mains water pressure 40psi (80psi min for optimum production amounts)
- Ph 3 to 11
Mains water tds reading below 1000ppm
Reverse Osmosis (R/O) System – Installation & Operating Instructions
Important: This Reverse Osmosis (R/O) system must be installed by a competent person. Installation must comply with all local water regulations and the requirements of your regional water authority.
Package Contents
- 1 x Reverse Osmosis Unit
- 1 x Hosepipe Connector
- 6 Metres Plastic Tubing
- 1 x R/O Housing Spanner
Pre-Filter Installation & Maintenance
To ensure a watertight seal and prevent friction damage, apply a light coating of petroleum jelly (Vaseline) to all rubber O-rings before installation.
Filter Replacement Order (Right to Left)
- Right: 5 Micron Sediment Filter (White Housing)
- Centre: GAC Carbon Filter (White Housing)
- Left: CTO Carbon Block Filter (White Housing)
Always ensure housings are tightened securely using the supplied spanner, without overtightening.
Installing the R/O Membrane
- Do not remove the membrane from its protective packaging until ready to install.
- Remove the membrane housing cap.
- Insert the membrane by pushing the spigot end (with two O-rings) firmly into the socket at the far end of the housing.
- Ensure the membrane is fully seated.
- Lubricate the housing O-ring lightly with petroleum jelly.
- Refit and securely tighten the membrane housing cap.
Poly Tubing Installation (Push-Fit Connections)
All connections use push-fit fittings:
- Remove the blue locking clip.
- Insert the poly tube firmly into the fitting.
- Refit the blue locking clip to secure the connection.
Three Required Connections
- Water Supply Inlet: Connect to the R/O unit inlet on the right-hand side (Red Sticker).
- Purified Water Outlet: Connect to the outlet located on the top right-hand side of the DI cartridge (Blue Sticker).
- Waste Outlet: Connect to the flow restrictor on the left-hand rear of the system (Black Sticker).
The blue tap located on the top left-hand side is the manual flush valve.
Before first use: Open the flush tap for approximately 30 seconds, then close. This will flush any contaminants from the membrane.
Start-Up Procedure
- Ensure all connections are secure.
- Turn on the water supply.
- Inspect all fittings and housings for leaks.
- Within a few minutes, purified R/O water will begin to flow slowly.
- Allow the system to run for approximately 5 minutes during first use to flush the carbon filters.
Your Reverse Osmosis system is now ready for operation.
Original: $178.61
-65%$178.61
$62.51Product Information
Product Information
Shipping & Returns
Shipping & Returns
Description
Our RO/Di units include a DI chamber fitted as the final stage of filtration
( which is supplied filled with high quality tulsion MB115 Resin)
After passing through the Pre filters (stage 1 -2 and 3) and the r/o membrane, the r/o filtered water is then passed through the DI filter, to reduce the TDS reading to 0.
The 5 Stages of Filtration Are:
- 5 - Micron Sediment Filter Made of 100% Pure Polypropylene Fibres. Removes Dirt, Sand and Rust.
- A gac granular activated carbon filter Removes chlorine and organic compounds.
- A Carbon Block Filter Composed of High Performance Carbon. Removes Trihalomethanes, Pesticides, Volatile Organic Chemicals and 99.95% of Giardia and Cryptosporidium Cysts.
- High Rejection Thin Film Composite Reverse Osmosis Membranes The Membranes Remove Contaminants Present in your Water Including, up to 99% of Dissolved Salts, Lead, Copper, Barium, Bacterial By-Products, Oestrogen and Silica.
- DI Cartridge filled with tulsion MB115 mixed bed resin for total De-ionisation (polishing the water) of your reverse osmosis water.
Enabling you to achieve a total dissolved solids (TDS) of 0ppm
These Superb Systems Come with Installation Instructions, and all Pipes, Pre Filters, Post Filters, and Fittings Required for easy Installation
Please note:
- The input water must meet the following criteria for the unit to operate water temp must be less than 45 degrees Celsius.
- iron content max 0.1ppm
- Min mains water pressure 40psi (80psi min for optimum production amounts)
- Ph 3 to 11
Mains water tds reading below 1000ppm
Reverse Osmosis (R/O) System – Installation & Operating Instructions
Important: This Reverse Osmosis (R/O) system must be installed by a competent person. Installation must comply with all local water regulations and the requirements of your regional water authority.
Package Contents
- 1 x Reverse Osmosis Unit
- 1 x Hosepipe Connector
- 6 Metres Plastic Tubing
- 1 x R/O Housing Spanner
Pre-Filter Installation & Maintenance
To ensure a watertight seal and prevent friction damage, apply a light coating of petroleum jelly (Vaseline) to all rubber O-rings before installation.
Filter Replacement Order (Right to Left)
- Right: 5 Micron Sediment Filter (White Housing)
- Centre: GAC Carbon Filter (White Housing)
- Left: CTO Carbon Block Filter (White Housing)
Always ensure housings are tightened securely using the supplied spanner, without overtightening.
Installing the R/O Membrane
- Do not remove the membrane from its protective packaging until ready to install.
- Remove the membrane housing cap.
- Insert the membrane by pushing the spigot end (with two O-rings) firmly into the socket at the far end of the housing.
- Ensure the membrane is fully seated.
- Lubricate the housing O-ring lightly with petroleum jelly.
- Refit and securely tighten the membrane housing cap.
Poly Tubing Installation (Push-Fit Connections)
All connections use push-fit fittings:
- Remove the blue locking clip.
- Insert the poly tube firmly into the fitting.
- Refit the blue locking clip to secure the connection.
Three Required Connections
- Water Supply Inlet: Connect to the R/O unit inlet on the right-hand side (Red Sticker).
- Purified Water Outlet: Connect to the outlet located on the top right-hand side of the DI cartridge (Blue Sticker).
- Waste Outlet: Connect to the flow restrictor on the left-hand rear of the system (Black Sticker).
The blue tap located on the top left-hand side is the manual flush valve.
Before first use: Open the flush tap for approximately 30 seconds, then close. This will flush any contaminants from the membrane.
Start-Up Procedure
- Ensure all connections are secure.
- Turn on the water supply.
- Inspect all fittings and housings for leaks.
- Within a few minutes, purified R/O water will begin to flow slowly.
- Allow the system to run for approximately 5 minutes during first use to flush the carbon filters.
Your Reverse Osmosis system is now ready for operation.